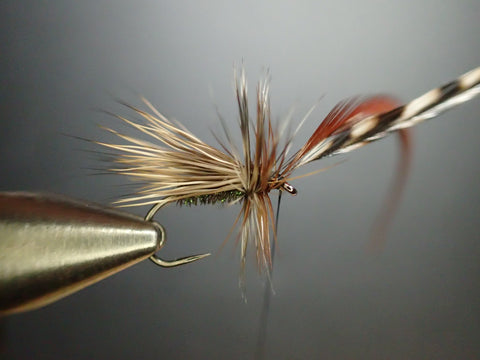
Peacock Caddis by Nicole March
Nov 13, 2020
The Peacock Caddis is a simple, yet standard staple in any fly box, and is productive in many conditions. This pattern works well and is an easy tie that you can change up with sizes as needed. We like this fly in riffle and pocket water when not much is hatching. The peacock herl is a great attractor and has been used in countless patterns, showcasing the effective use of this material.
Hook: Partridge Ideal standard dry fly hook #12 or Sprite All Purpose Dry
Thread: 6/0 Black Uni 6/0, Danville 6/0
Body: 2 strands of peacock herl
Ribbing: length of thread (use the tag end)
Wing: Deer Hair
Hackle: One brown and one grizzly dry fly hackle feather
Step 1

With your hook firmly secured in the vise, leaving the tag end of your thread about 6” long, start your thread about one eye length from behind the eye. Then take touching wraps towards the bend, stopping across from the barb.
Note: Don’t remove the tag end as this will be used for ribbing
Step 2


Select two strands of peacock herl and remove the fragile tips from the ends by pinching them with your fingers or snipping them with your scissors. Tie the peacock herl in at the base of the shank with a few wraps and leave your bobbin hanging in place.
Step 3


Without advancing your thread beforehand, begin wrapping your two strands of peacock herl up the shank behind it. Doing this will advance the thread on its own as you wrap and will help to secure the herl to the shank a little tighter.
Step 4

Once you have reached the front of the hook you can tie your herl off, being sure to leave enough room behind the eye for the rest of the material.
Step 5


Now bring your thread ribbing forward, counter wrapping it over the herl. Tie off the thread ribbing and take a few wraps back over the herl to about the 1/3 mark. This will leave room behind the wing to help the front of it lie down a little flatter.
Step 6


Select a small clump of deer hair from the hide, hold it tight and give it a little twist at the base before snipping it off and brushing out the underfur with a comb. Placing the deer hair (tips down) in your hair stacker; give it a few taps on its base to align the tips then carefully remove them.
Step 7

Hold the clump of deer hair over the hook shank and measure the tips so that they extend slightly longer than the hook shank then transfer them to your opposite hand.
Step 8


Reposition the deer hair wing back in place now that you are holding it with the opposite hand and with the tips measured, you can now trim the butt ends flush and somewhat even with the eye of the hook.
Holding steady, take one loose wrap around the clump and then a tight one to secure the hair in place before continuing with more wraps; but don’t let go just yet or it will start to spin! Now, holding tight, secure everything before letting go.
Step 9


Your fly should resemble a somewhat messy elk hair caddis profile at this point but you are going to cover those snipped butt ends with thread wraps so that you can lay your hackle on top of them. Cover the waste ends but be sure to run the thread over the wing a bit before stopping, this will bring the wing down on a lower angle.
Step 10


Select, measure and prep your two hackle feathers for tie in by stripping the fibers about ¼” down from either side of the stem.
Step 11


Tie both of your feathers in by the bare stem over the thread base, trim the stem ends back away from the eye then holding both feathers together; take wraps up the shank with them at the same time.
Step 12

Once you have hackled the front of your fly you can tie the material off, trim the waste feather ends create a small head before whip finishing. And your fly is complete!
Step 13

Peacock Caddis FINISHED!


13 comments
Awesome tie !!!
Great instructions!
I Love Reading the News Letters I receive from You Folks.
Take Care,
Aloha🌴🏄🏻♂️🎣🐟