Renegade by Nicole March
Feb 28, 2017
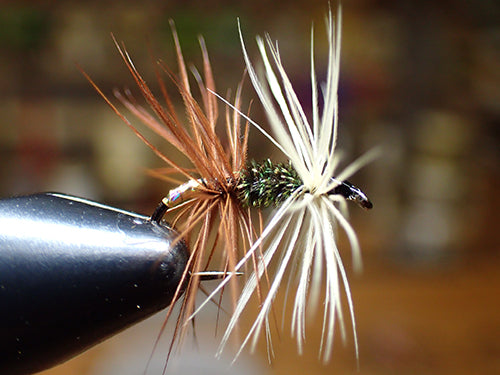
The Renegade Dry is an attractor pattern that has been around since the late 1920’s and works great in smaller sizes to imitate a mating ball of midges, or as a searching pattern in the larger sizes. When tying this fly keep in mind that the body is split up into 3 main sections; Two sections of hackle and one of herl. I find the best way to keep track of how far you should extend the next material, is to lay touching thread wraps towards the hook eye, stopping at the same location you want to stop the material. This way you can see clearly where you should be at each step, and will also help to create a uniform underbody; which is an important factor to the look of your finished fly.
Hook: Standard dry fly hook size 12
Partridge Patriot Ideal Dry, Barbless
Partridge Patriot Standard Dry, Barbless
Thread: Black 8/0
Uni 8/0
Superfly 8/0
Tag: Holographic Tinsel
UTC Holographic Flat Tinsel
Rear Hackle: Dry Fly Hackle (Brown)
Body:Peacock Herl
Front Hackle: Dry Fly Hackle (Cream)

Secure your hook in the vise and start your thread one eye length behind the eye itself. Continue taking wraps down the shank, stopping right before the bend.

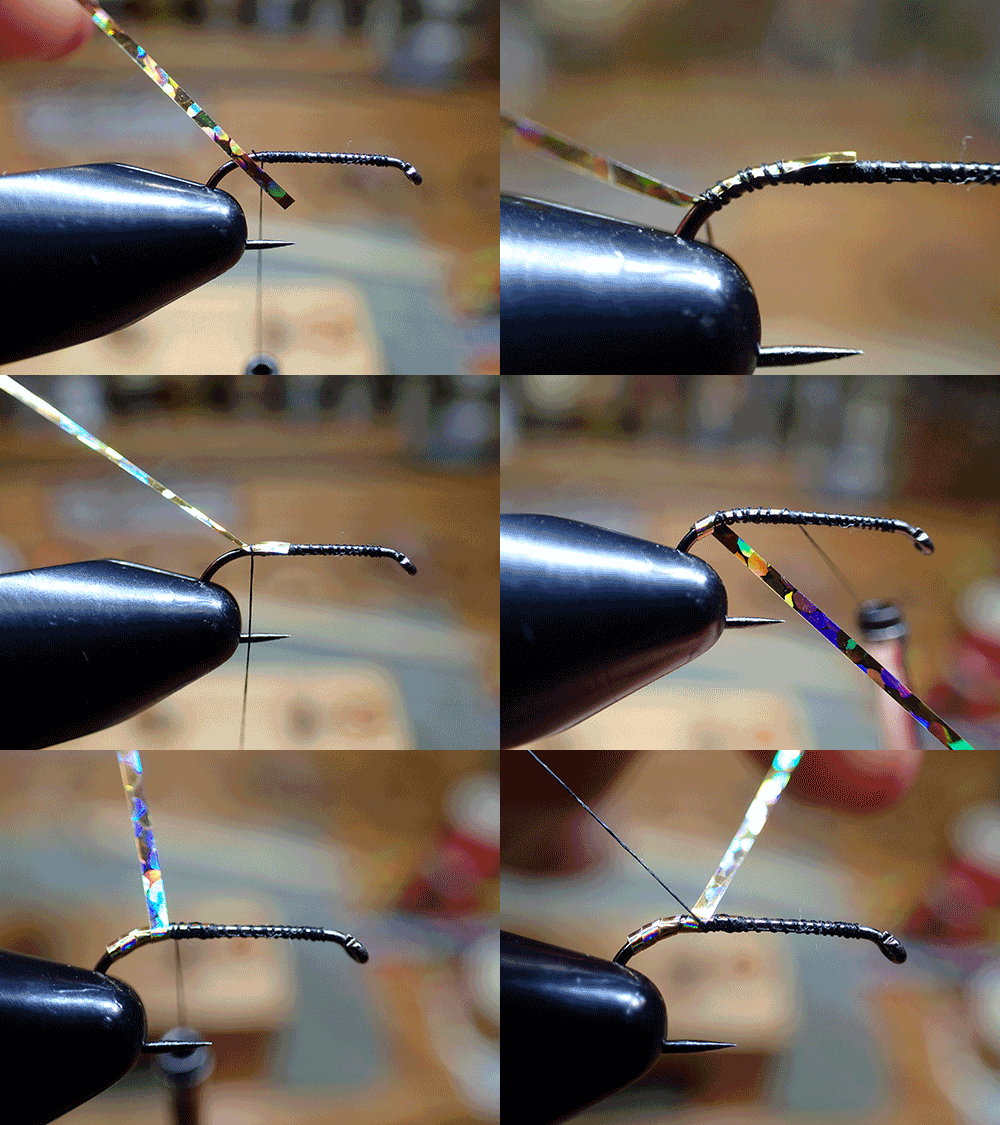
Attach your holographic tinsel then advance your thread over it, moving slightly down the bend. Bring your thread back up, over the waste ends of the tinsel. Now grab a hold of the holographic tinsel and take slightly overlapping turns with it up the hook bend. This will create a tag at the base of the fly, and doing it in this manner will eliminate bulk. Stop overlapping the material when you are across from the hook barb. Tie your material off, snip the excess and cover the waste ends.

Now its time to select your hackle. When gauging the right size feather on this pattern, what you are looking for are the stiff fibers to extend slightly over the hook point when wrapped, a little less than half a hook gap in length overhang is a good way to measure. Prep your material by stripping or cutting some of the fibers from the stem, and then stripping a few more fibers up the stem on the side that will be laying lay on the shank when wrapped.

Now its time to select your hackle. When gauging the right size feather on this pattern, what you are looking for are the stiff fibers to extend slightly over the hook point when wrapped, a little less than half a hook gap in length overhang is a good way to measure. Prep your material by stripping or cutting some of the fibers from the stem, and then stripping a few more fibers up the stem on the side that will be laying lay on the shank when wrapped.
If you look at your prepped feather you will see that one side is glossy and one is dull. You’ll want to tie this in with the dull side facing towards the bend of the hook, and shiny side towards the eye. Tie your material in across from the hook barb, but be sure to leave just enough bare stem showing so that you have a clean first wrap around. Trapping all the fibers under the thread will make them splay in every direction. Once you have secured your material with a loose wrap, advance your thread about 1/3 of the way up the hook shank and leave it there.

Begin taking touching wraps with the brown hackle up the shank but be mindful of the hook point. Once you have reached the 1/3 mark you can tie off your material, snip the excess and advance your thread up another 1/3 of the way.

Before tying in your peacock herl, take a look at the strand material. If you find that one side if fuller than the other, then you will want to tie it in so that the full side is the one that will be showing when wrapped. Pull the tip off of the peacock herl and discard it since that is the most fragile area of the material, and if you were to tie it in at that point it would break. Tie your material in where the thread stopped at the next 1/3 point and begin taking wraps back towards the rear hackle. Be sure to get the material close to the hackle or you will have a gap. Once you reach the hackle, come back over the material again with your wraps to fill in any spaces, stop at the 1/3 mark where your thread was left, tie and snip your excess herl off.

Select and prep your cream dry fly hackle in the same manner as you did the brown, and tie it in in front of the peacock herl. Now advance your thread to the final 1/3 of the way up the shank, being sure to stop one eye length behind the eye itself. You will need this space to create a head after. Wrap your hackle in the same manner as before, tie it off and create a head. You can now finish your fly with lacquer or head cement of your choice.

Finished!
*Other variations*
Renegade Wet Fly
Thread: Black
Rear Tag: Gold Holo Tinsel
Rear Hackle: Hen Hackle in Brown Body: Peacock Herl Front Hackle: Hen Hackle in Cream

Rear Tag: Gold Holo Tinsel
Thread: Black
Rear Hackle: Dry Fly Hackle in Brown
Body: Peacock Herl and Red Floss
Front Hackle: Dry fly Hackle in Cream
Hook: 2XL Dry or Light nymph hook size 8-12
Thread: Black
Rear Tag: Gold Holo Tinsel
Front and Rear Hackle: Dry Fly Hackle in Brown
Middle Hackle: Dry Fly Hackle in Cream (1-2 sizes larger than the brown)
Body: Peacock Herl
Hook: Standard dry fly hook size 12
Partridge Patriot Ideal Dry, Barbless
Partridge Patriot Standard Dry, Barbless
Thread: Black 8/0
Uni 8/0
Superfly 8/0
Tag: Holographic Tinsel
UTC Holographic Flat Tinsel
Rear Hackle: Dry Fly Hackle (Brown)
Body:Peacock Herl
Front Hackle: Dry Fly Hackle (Cream)

Secure your hook in the vise and start your thread one eye length behind the eye itself. Continue taking wraps down the shank, stopping right before the bend.

Attach your holographic tinsel then advance your thread over it, moving slightly down the bend. Bring your thread back up, over the waste ends of the tinsel. Now grab a hold of the holographic tinsel and take slightly overlapping turns with it up the hook bend. This will create a tag at the base of the fly, and doing it in this manner will eliminate bulk. Stop overlapping the material when you are across from the hook barb. Tie your material off, snip the excess and cover the waste ends.

Now its time to select your hackle. When gauging the right size feather on this pattern, what you are looking for are the stiff fibers to extend slightly over the hook point when wrapped, a little less than half a hook gap in length overhang is a good way to measure. Prep your material by stripping or cutting some of the fibers from the stem, and then stripping a few more fibers up the stem on the side that will be laying lay on the shank when wrapped.

Now its time to select your hackle. When gauging the right size feather on this pattern, what you are looking for are the stiff fibers to extend slightly over the hook point when wrapped, a little less than half a hook gap in length overhang is a good way to measure. Prep your material by stripping or cutting some of the fibers from the stem, and then stripping a few more fibers up the stem on the side that will be laying lay on the shank when wrapped.
If you look at your prepped feather you will see that one side is glossy and one is dull. You’ll want to tie this in with the dull side facing towards the bend of the hook, and shiny side towards the eye. Tie your material in across from the hook barb, but be sure to leave just enough bare stem showing so that you have a clean first wrap around. Trapping all the fibers under the thread will make them splay in every direction. Once you have secured your material with a loose wrap, advance your thread about 1/3 of the way up the hook shank and leave it there.

Begin taking touching wraps with the brown hackle up the shank but be mindful of the hook point. Once you have reached the 1/3 mark you can tie off your material, snip the excess and advance your thread up another 1/3 of the way.

Before tying in your peacock herl, take a look at the strand material. If you find that one side if fuller than the other, then you will want to tie it in so that the full side is the one that will be showing when wrapped. Pull the tip off of the peacock herl and discard it since that is the most fragile area of the material, and if you were to tie it in at that point it would break. Tie your material in where the thread stopped at the next 1/3 point and begin taking wraps back towards the rear hackle. Be sure to get the material close to the hackle or you will have a gap. Once you reach the hackle, come back over the material again with your wraps to fill in any spaces, stop at the 1/3 mark where your thread was left, tie and snip your excess herl off.

Select and prep your cream dry fly hackle in the same manner as you did the brown, and tie it in in front of the peacock herl. Now advance your thread to the final 1/3 of the way up the shank, being sure to stop one eye length behind the eye itself. You will need this space to create a head after. Wrap your hackle in the same manner as before, tie it off and create a head. You can now finish your fly with lacquer or head cement of your choice.

Finished!
*Other variations*
Renegade Wet Fly

Hook: Standard nymph hook size 10-16
Thread: Black
Rear Tag: Gold Holo Tinsel
Rear Hackle: Hen Hackle in Brown Body: Peacock Herl Front Hackle: Hen Hackle in Cream
Royal Renegade


Hook: Standard dry fly hook size 10-14
Rear Tag: Gold Holo Tinsel
Thread: Black
Rear Hackle: Dry Fly Hackle in Brown
Body: Peacock Herl and Red Floss
Front Hackle: Dry fly Hackle in Cream
The Double Renegade

Hook: 2XL Dry or Light nymph hook size 8-12
Thread: Black
Rear Tag: Gold Holo Tinsel
Front and Rear Hackle: Dry Fly Hackle in Brown
Middle Hackle: Dry Fly Hackle in Cream (1-2 sizes larger than the brown)
Body: Peacock Herl


2 comments
This fly " work" so well for me, my favorite…
All sort of river fish, even small sized, catched with different Renegade hooks sizes.
But my homemade flies not so clean than yours, Nicole…
Gerard. From France, Loire valley.
I love this pattern! I ran into a stonefly hatch yesterday and the double renegade was hot!